
如何在 Shopify 上設置 GA4 電子商務跟踪? 分步指南
已發表: 2022-09-13- 如何在 Shopify 上安裝 Google Tag Manager (GTM)?
- 第一階段:將 GTM 容器代碼和客戶詳細信息腳本添加到 <head> 下的 theme.liquid 中。
- 第二階段:將 GTM 容器代碼和客戶詳細信息腳本添加到結帳頁面。
- 在 GTM 上創建數據層變量
- 在 GTM 上創建 GA4 頁面查看標籤
- 跟踪 view_item 和購買作為事件並將用戶範圍和產品相關詳細信息傳遞給 GA4
- 第一階段:在 Shopify 上添加 view_item 數據層。
- 第二階段:為 view_item 和 purchase 事件創建 GTM 觸發器。
- 第三階段:創建 GTM 標籤。
- 下載 GTM 食譜
如何在 Shopify 上安裝 Google Tag Manager (GTM)?
第一階段:將 GTM 容器代碼和客戶詳細信息腳本添加到 <head> 下的 theme.liquid 中。
- 登錄您的 Gmail 帳戶。
- 轉到谷歌標籤管理器。
- 選擇正確的 GTM 帳戶。
- 單擊 GTM容器 ID 。
- 複製GTM 容器代碼的第一個腳本,其中包含將代碼粘貼到 <head> 部分的說明。
- 登錄到您的 Shopify 商店,然後單擊導航面板左側在線商店下的主題。
- 單擊“操作”下拉菜單下的“編輯代碼” 。
- 點擊 Layout 下的theme.liquid 。
- 將復制的 GTM 容器代碼(在步驟 5 中)粘貼到頁面的 <head> 盡可能高的位置。
- 複製下面提到的客戶詳細信息腳本並將其粘貼到GTM 容器代碼上方的<head> 部分。
- 點擊右上角的theme.liquid 上的保存。
第 1 步:登錄到您的 Gmail 帳戶。
第 2 步:通過以下鏈接轉到 Google 跟踪代碼管理器:https://tagmanager.google.com/
第 3 步:選擇正確的 GTM 帳戶

第 4 步:單擊 GTM 容器 ID

第 5 步:複製 GTM 容器代碼的第一個腳本,其中包含將代碼粘貼到 <head> 部分的說明。

第 6 步:現在登錄您的 Shopify 商店,然後單擊左側導航面板上在線商店下的主題。

第 7 步:單擊“操作”下拉菜單下的“編輯代碼” 。

第 8 步:點擊 Layout 下的theme.liquid 。

第 9 步:將復制的 GTM 容器代碼(在第 5 步中)粘貼到頁面的 <head> 盡可能高的位置。
第 10 步:複製以下客戶詳細信息腳本。 現在,將其粘貼到 GTM 容器代碼上方的 <head> 部分,如下圖所示。 此腳本將幫助將 USER 範圍的數據傳遞給 GA4。
<腳本>
窗口.dataLayer = 窗口.dataLayer || [];
window.dataLayer.push({
{% 如果客戶 %}
用戶類型:“會員”,
顧客: {
id: {{ customer.id }},
lastOrder: "{{ customer.orders.first.created_at | date: '%B %d, %Y %I:%M%p' }}",
orderCount: {{ customer.orders.size }},
totalSpent: {% if customer %}{% assign total_spent = 0 %}{% for item in customer.orders %}{% assign total_spent = total_spent | 加: item.total_net_amount %}{% endfor %}{{ total_spent | money_without_currency | 刪除:"," }}{% else %}""{% endif %},
標籤:{{- customer.tags | json-}}
},
{% 別的 %}
用戶類型:“訪客”,
顧客: {
ID: ””,
最後的訂單: ””,
訂單數:“”,
總花費:“”,
標籤: ""
},
{% 萬一 %}
});
</腳本>

第 11 步:點擊右上角的 theme.liquid 上的保存。

做得好 !!
您已完成將 GTM 容器代碼添加到 Shopify 的第一階段。 接下來,您將需要在結帳頁面上添加GTM 容器代碼、客戶詳細信息腳本和購買數據層。
第二階段:將 GTM 容器代碼和客戶詳細信息腳本和購買數據層添加到結帳頁面。
- 在 Shopify 商店管理員上,單擊左下角的設置。
- 點擊結帳和帳戶
- 向下滾動並在狀態塊中的順序下方查找附加腳本。
- 首先粘貼 GTM 容器代碼。 現在,複製以下客戶詳細信息腳本並將其粘貼到 GTM 容器代碼上方。
- 在客戶詳細信息腳本和 GTM 容器代碼之間複製並粘貼以下購買數據層。
第 1 步:在 Shopify 商店管理員中,單擊左下角的設置。

第 2 步:點擊結帳和帳戶。

第 3 步:向下滾動並在狀態塊中的訂單下方查找附加腳本。

第 4 步:首先粘貼 GTM 容器代碼。 現在,複製以下客戶詳細信息腳本並將其粘貼到 GTM 容器代碼上方。

第 5 步:在客戶詳細信息腳本和 GTM 容器代碼之間複製並粘貼以下購買數據層。
<script>{% if first_time_accessed %}
window.dataLayer.push({
'page_type': '購買',
'event': 'purchase', /* 在 GTM 中創建自定義事件 */
'transaction_id': '{{ order.name || order.order_number }}',
'totalValue': {{ 總價格 | money_without_currency | remove:',' }}, // 包括稅費和運費
'subtotalValue': {{ subtotal_price | money_without_currency | 消除:',' }},
'稅': {{ tax_price | money_without_currency | 消除:',' }},
“運費”:{{ shipping_price | money_without_currency | 消除:',' }},
'貨幣': '{{ shop.currency }}',
'payment_type': '{{ order.transactions[0].gateway }}', //可選參數
'電子商務': {
'checkout_currency': '{{ checkout.currency }}',
'價值': '{{ checkout.total_price | money_without_currency | remove:',' }}', // 訂單總額(所有產品的價格 + 運費)
'稅': '{{ checkout.tax_price | money_without_currency | remove:',' }}', // 稅
'運費':'{{ checkout.shipping_price | money_without_currency | remove:',' }}', // 運費
'transaction_id': '{{ transactions[0].id }}', // 交易id
'項目': [
{% for line_item in line_items %}
{
'item_name': '{{ line_item.product.title | 替換:"'","##@@[電子郵件保護]@##" }}'.replace("##@@[電子郵件保護]@##", "'"),
'item_id': '{{ line_item.sku || line_item.product.id }}',
“價格”:{{ line_item.final_price | money_without_currency | 消除:',' }},
'item_brand': '{{ line_item.vendor }}',
“數量”:{{ line_item.quantity }},
'item_variant': '{{ line_item.variant.title }}'
},
{% endfor %}
]
}
});
{% 萬一 %}
</腳本>
第六步:點擊右下角的保存。
恭喜! 您已在 Shopify 上成功添加 GTM 容器代碼。 現在我們將繼續並在 GTM 上創建數據層變量,然後再製作 GA4 Page View Tag。 當頁面瀏覽標籤被加載時,這些變量將允許我們收集用戶範圍的數據並將其傳遞給 GA4。
在 GTM 上創建數據層變量
- 單擊 GTM 左側導航面板上的變量。
- 單擊用戶定義的變量下的新建。
- 單擊變量配置上的任意位置。
- 選擇頁面變量下的數據層變量。
- 分配數據層變量名稱。
- 重命名變量並單擊保存。
第 1 步:單擊 GTM 左側導航面板上的變量。

第 2 步:單擊用戶定義的變量下的新建。

第 3 步:單擊變量配置上的任意位置。

第四步:選擇頁面變量下的數據層變量。

第 5 步:分配數據層變量名稱。

第 6 步:重命名變量並單擊Save 。

按照上述步驟,創建下述數據層變量。
| 數據層變量名稱: | 重命名變量 |
|---|---|
| 用戶身份 | “dlv – 客戶 – id – 變量” |
| 客戶.lastOrder | “dlv – 客戶 – lastOrder – 變量” |
| customer.orderCount | “dlv – 客戶 – orderCount – 變量” |
| 客戶標籤 | “dlv – 客戶 – 標籤 – 變量” |
| customer.totalSpent | “dlv – 客戶 – totalSpent – 變量” |
| 客戶.userType | “dlv – 客戶 – userType – 變量” |
| 事件 | “dlv – 事件 – 變量” |
在 GTM 上創建 GA4 頁面查看標籤
- 轉到 Google Analytics 並選擇 GA4 媒體資源。 https://analytics.google.com/
- 單擊左下角的齒輪圖標。
- 單擊屬性級別下的數據流。
- 選擇 Web 流並單擊箭頭 (>)。
- 複製 GA4 測量 ID。
- 轉到谷歌標籤管理器。 https://tagmanager.google.com/
- 單擊添加新標籤。
- 單擊標籤配置上的任意位置。
- 選擇 Google Analytics:GA4 配置。
- 將之前複製的 GA4 測量 ID 粘貼到“測量 ID”框下。
- 在要設置的字段下,單擊添加行,然後添加字段名稱及其值。
- 在用戶屬性下,添加以下內容作為屬性名稱和值。
- 單擊觸發上的任意位置。
- 選擇所有頁面作為觸發器。
- 重命名標籤並單擊保存。
第 1 步:轉到 Google Analytics(分析)並選擇 GA4 屬性。 https://analytics.google.com/
第2步:點擊左下角的齒輪圖標。

第 3 步:單擊屬性級別下的數據流。

第 4 步:選擇 Web 流並單擊箭頭 (>)
")
第 5 步:複製 GA4 測量 ID。

第 6 步:轉到 Google 跟踪代碼管理器。 https://tagmanager.google.com/
第 7 步:單擊添加新標籤。

第 8 步:單擊標籤配置上的任意位置。

第 9 步:選擇 Google Analytics:GA4 配置。

第 10 步:將之前複製的 GA4 測量 ID 粘貼到“測量 ID”框下。

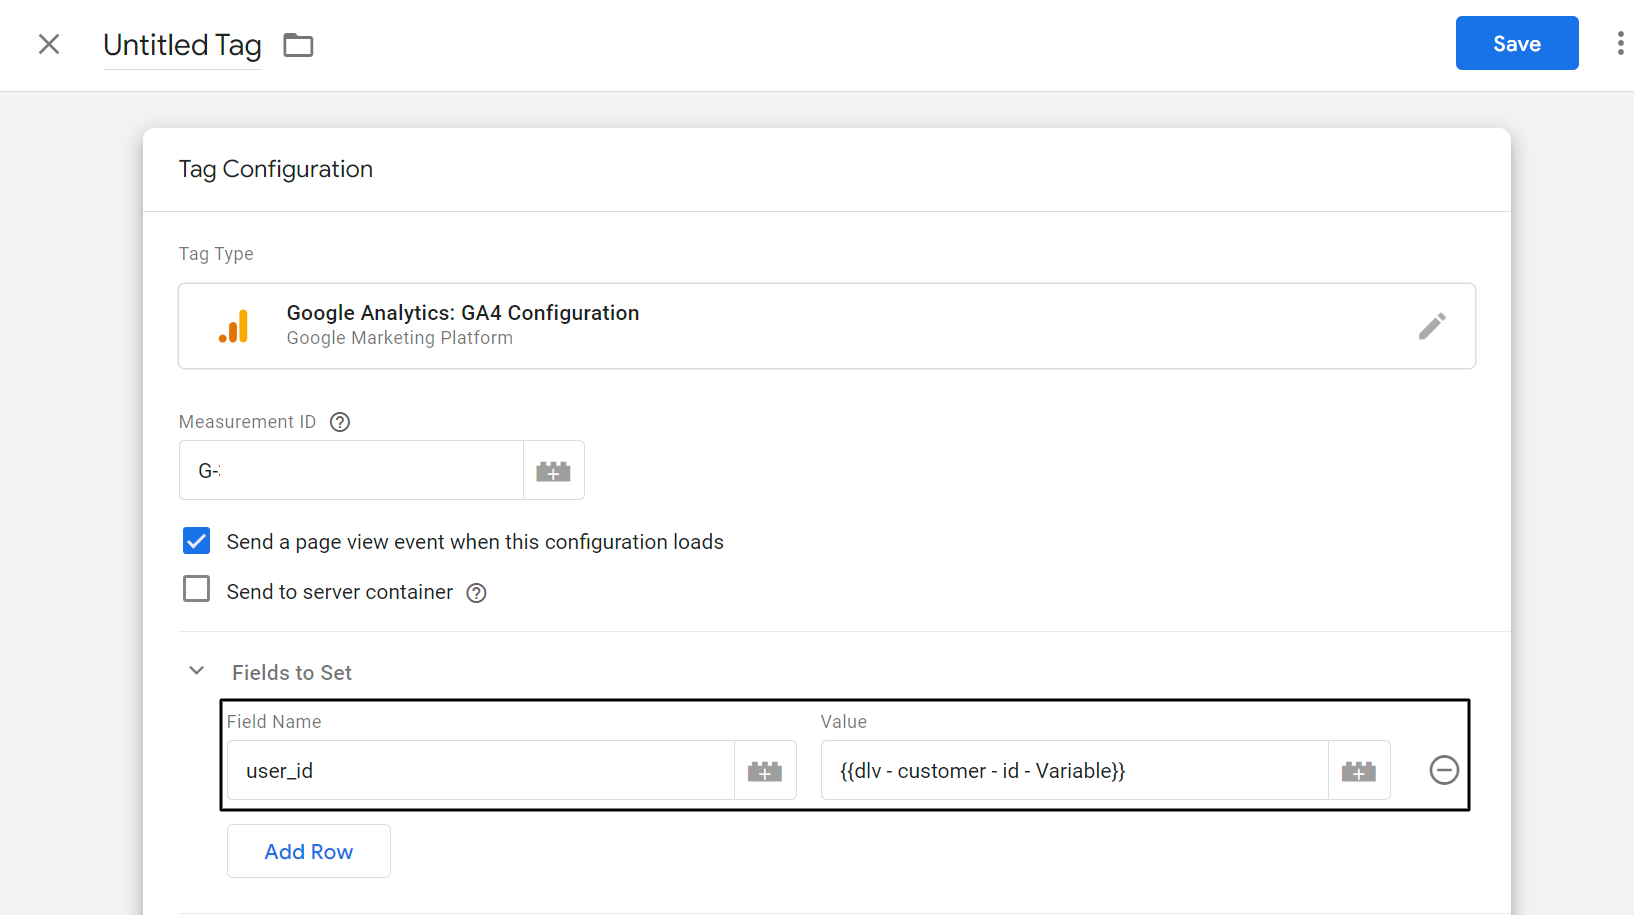
第 11 步:在要設置的字段下,單擊添加行,然後添加字段名稱及其值,如下所述:
字段名稱: user_id
值: {{dlv – 客戶 – id – 變量}}
第 12 步:在用戶屬性下,添加屬性名稱和值,如下所述。
| 屬性名稱 | 價值 |
|---|---|
| 客戶ID | {{dlv – 客戶 – id – 變量}} |
| 最後的訂單 | {{dlv – 客戶 – 最後訂單 – 變量}} |
| order_count | {{dlv – 客戶 – 訂單數 – 變量}} |
| 總花費 | {{dlv – 客戶 – 總支出 – 變量}} |
| 用戶類型 | {{dlv – 客戶 – 用戶類型 – 變量}} |


第 13 步:單擊觸發上的任意位置。
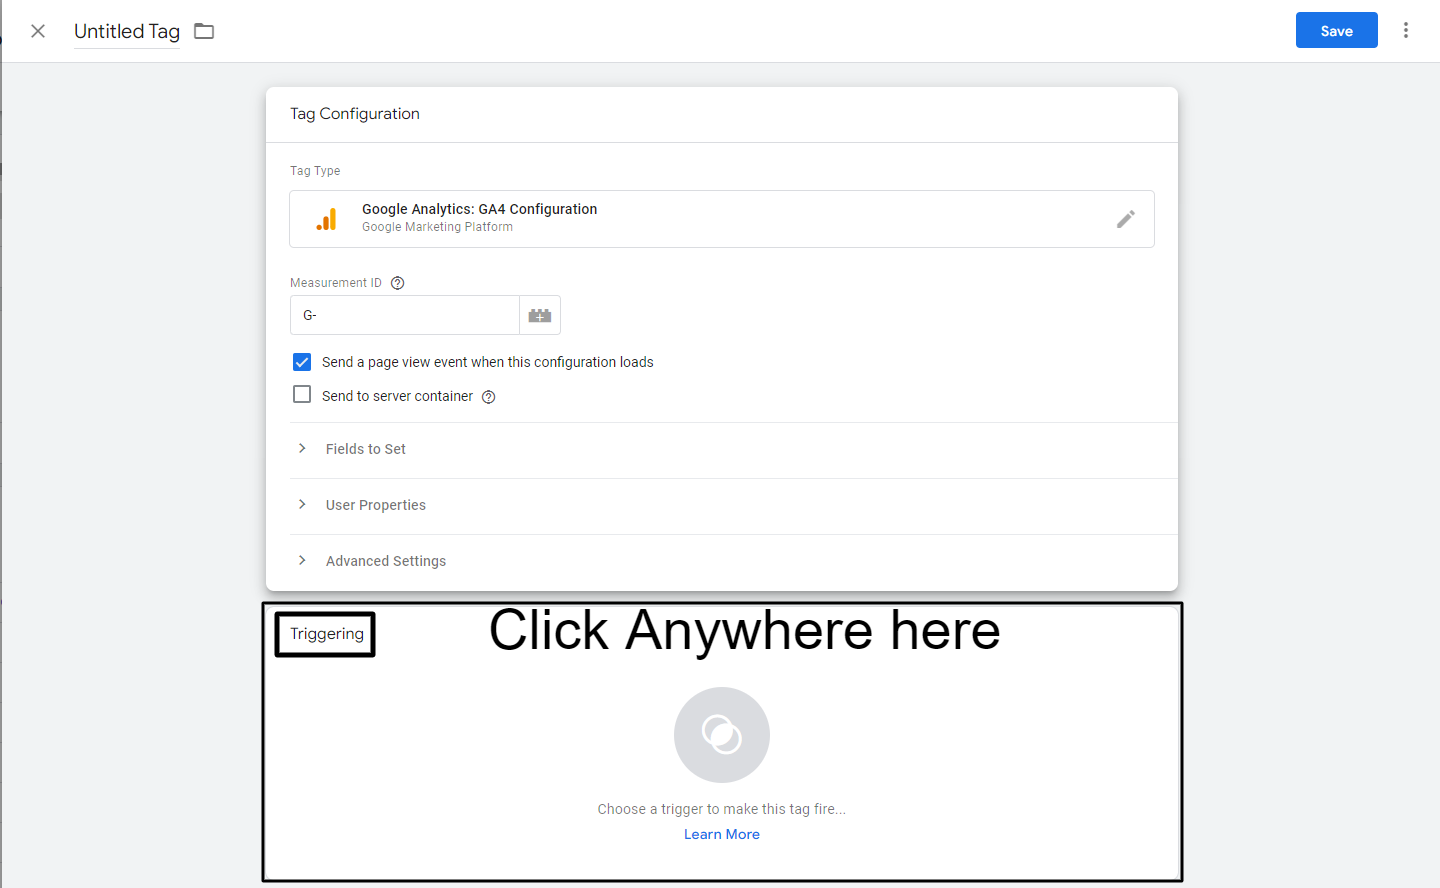
第 14 步:選擇所有頁面作為觸發器。

第 15 步:重命名標籤。

傑出的!
您現在已經製作了 GA4 頁面查看標籤。
現在讓我們看看如何在有人查看產品頁面時跟踪 view_item 事件並將必要的詳細信息傳遞給 GA4。
跟踪並將 view_item 和購買事件數據傳遞給 GA4。
在 Shopify 上添加 view_item 數據層。
- 登錄到您的 Shopify 商店,然後單擊左側導航面板上在線商店下的主題。
- 單擊“操作”下拉菜單下的“編輯代碼”。
- 單擊部分下的 main-product.liquid。
- 複製並粘貼下面提到的數據層腳本。
- 單擊右上角的 main-product.liquid 上的保存
第 1 步:登錄您的 Shopify 商店,然後單擊左側導航面板上在線商店下的主題。
第 2 部分:單擊“操作”下拉菜單下的“編輯代碼”。
第 3 部分:單擊部分下的 main-product.liquid。

第 4 步:複製並粘貼下面提到的數據層腳本。
<腳本>
窗口.dataLayer = 窗口.dataLayer || [];
window.dataLayer.push({
事件:'view_item',
電子商務: {
項目: [{
item_name: '{{ product.title | 替換:"'","##@@[電子郵件保護]@##" }}'.replace("##@@[電子郵件保護]@##", "'"),
item_id: "{% if product.sku %}{{ product.sku }}{% else %}{{ product.id}}{% endif %}",
價格:“{{ product.price | money_without_currency | remove:',' }}”,
item_brand: "{{ product.vendor | remove: "'" | remove: '"' }}",
{% for collection in product.collections %}
item_category{% unless forloop.index == 1 %}{{ forloop.index }}{% endunless %}: "{{ collection.title }}",
{% endfor %}
item_variant: "{{ product.selected_or_first_available_variant.title | remove: "'" | remove: '"' }}",
數量:'1'
}]
}
});
</腳本> 
第 5 步:點擊右上角的 main-product.liquid 上的保存。

為 view_item 和購買事件創建 GTM 觸發器。
- 轉到谷歌標籤管理器。
- 單擊左側導航面板上的觸發器。
- 單擊新建。
- 單擊觸發器配置上的任意位置。
- 在其他下選擇自定義事件。
- 分配事件名稱view_item。
- 將觸發器重命名為CE – EEC – view_item – Trigger並點擊保存。
筆記:
- 將事件名稱指定為購買
- 將觸發器重命名為CE - EEC - 購買 - 觸發器並點擊保存。
第 1 步:轉到 Google 跟踪代碼管理器。
第 2 步:單擊左側導航面板上的觸發器。

第三步:點擊新建。

第 4 步:單擊觸發器配置上的任意位置。

第 5 步:在“其他”下選擇“自定義事件”。

第 6 步:分配事件名稱view_item。

第7步:重命名觸發器CE-EEC-view_item-觸發器並點擊保存。

通過這些步驟,您已經創建了 view_item 事件觸發器。 現在您需要創建一個購買事件觸發器。 要觸發購買事件,請執行上述前 5 個步驟。
第 8 步:將事件名稱指定為購買

步驟 9:將觸發器重命名為 CE – EEC – purchase – Trigger 並單擊 Save。

如果您已按照所有步驟操作,那麼您幾乎已經完成了從您的 Shopify 商店收集 view_item 和購買事件相關數據以及用戶範圍數據的所有工作。 現在讓我們看看如何使用 Google 跟踪代碼管理器將這些詳細信息傳遞給 GA4。
為 view_item 和購買事件創建 GTM 標籤。
- 單擊左側導航面板上的標記。
- 點擊新建。
- 單擊標籤配置上的任意位置。
- 在特色標籤下選擇“Google Analytics:GA4 事件”。
- 在 Configuration Tag 中,從下拉列表中選擇“GA4 – Page View – Tag”。
- 分配事件名稱。 選擇之前製作的dataLayer變量——{{dlv——事件——變量}}
- 單擊更多設置,然後選擇電子商務下的發送電子商務數據。 選擇數據層作為您的數據源。
- 單擊觸發上的任意位置。
- 為 view_item 事件選擇之前創建的觸發器“CE – EEC – view_item – Trigger”。
- 將鼠標懸停在觸發部分的右上角,然後單擊鉛筆圖標。
- 現在點擊加號圖標。
- 選擇名為“CE – purchase – Trigger”的採購事件觸發器。
- 重命名標籤:“GA4 – EEC 事件 – 標籤”並點擊保存。
第 1 步:單擊左側導航面板上的標記。

第二步:點擊新建。

第 3 步:單擊標籤配置上的任意位置。

第 4 步:在特色標籤下選擇“Google Analytics:GA4 事件”。

第 5 步:在 Configuration Tag 中,從下拉菜單中選擇“GA4 – Page View – Tag”。

第 6 步:分配事件名稱。 選擇之前製作的數據層變量——{{dlv——事件——變量}}

第 7 步:點擊更多設置並選擇電子商務下的發送電子商務數據。 選擇數據層作為您的數據源。

第 8 步:單擊觸發上的任意位置。

步驟 9:為 view_item 事件選擇之前創建的觸發器“CE – EEC – view_item – Trigger”。

第 10 步:將鼠標懸停在觸發部分的右上角,然後單擊鉛筆圖標。

第11步:現在點擊加號圖標。

Step 12:選擇名為“CE-purchase-Trigger”的購買事件觸發器。

第 13 步:重命名標籤:“GA4 – EEC 事件 – 標籤”並點擊保存。

恭喜
通過本指南,您現在可以在 GA4 上跟踪查看產品和購買事件數據。 您還可以按照以下步驟查看 GA4 上的報告。
第一步:前往GA4物業。
第二步:單擊左側導航面板中的報告。
第三步:點擊貨幣化,然後點擊電子商務購買。
如果您希望獲得本指南的現成 GTM 容器,我強烈建議您下載 GTM 配方。
下載 GTM 食譜
結論
通過這個分步指南,我已經竭盡全力解決和解決所有 Shopify 店主的緊迫問題。 電子商務跟踪可能有許多細微差別,並且很難通過一篇博客文章來解決。 如果您有任何疑問,請隨時在 LinkedIn 上與我聯繫,並在那裡提出您的疑問。