如何在高级产品选项中为选项值添加自定义字段
已发表: 2020-11-20从上一篇文章中,您了解了如何创建 Magento 自定义选项字段。 我们还发现了如何在产品页面前端和管理面板中的订单页面上显示字段数据。
现在做什么?
让我们学习如何为选项值添加相同的自定义GTIN字段并将其显示在产品页面前端。
目录
- 步骤1。 新模块创建
- 1.作曲家.json
- 2.etc/module.xml
- 3.注册.php
- 第2步。 向数据库添加新字段
- 步骤#3。 添加逻辑以使用后端
- 第4步。 添加设置以禁用高级产品选项配置的 GTIN 字段显示
- 步骤#5。 在产品页面前端显示新字段
步骤1。 新模块创建
让我们从新模块的创建开始,这篇 Mageworx 博客文章详细介绍了该过程。
因此,事不宜迟,这是我们需要的代码:
1.作曲家.json
{ "name": "mageworx/module-optionvaluegtin", "description": "N/A", "require": { "magento/framework" : ">=100.1.0 <101", "magento/module-catalog": ">=101.0.0 <104" }, "type": "magento2-module", "version": "1.0.0", "license": [ "OSL-3.0", "AFL-3.0" ], "autoload": { "files": [ "registration.php" ], "psr-4": { "VendorName\\OptionValueGtin\\": "" } } }2.etc/module.xml
<?xml version="1.0"?> <config xmlns:xsi="http://www.w3.org/2001/XMLSchema-instance" xsi:noNamespaceSchemaLocation="urn:magento:framework:Module/etc/module.xsd"> <module name="VendorName_OptionValueGtin" setup_version="1.0.0"> <sequence> <module name="Magento_Catalog"/> <module name="MageWorx_OptionBase"/> </sequence> </module> </config>3.注册.php
<?php \Magento\Framework\Component\ComponentRegistrar::register( \Magento\Framework\Component\ComponentRegistrar::MODULE, 'VendorName_OptionValueGtin', __DIR__ );第2步。 向数据库添加新字段
是时候创建GTIN字段并将其添加到数据库中的相应表中了。
由于我们正在为选项值添加一个字段,因此需要 `catalog_product_option_type_value` 表。
让我们创建以下文件:
`app/code/VendorName/OptionValueGtin/Setup/InstallSchema.php`
<?php namespace VendorName\OptionValueGtin\Setup; use Magento\Framework\Setup\InstallSchemaInterface; use Magento\Framework\Setup\ModuleContextInterface; use Magento\Framework\Setup\SchemaSetupInterface; use Magento\Framework\DB\Ddl\Table; class InstallSchema implements InstallSchemaInterface { public function install(SchemaSetupInterface $setup, ModuleContextInterface $context) { $setup->startSetup(); $setup->getConnection()->addColumn( $setup->getTable('catalog_product_option_type_value'), 'gtin', [ 'type' => Table::TYPE_TEXT, 'nullable' => true, 'default' => null, 'comment' => 'Gtin (added by MageWorx Option Value Gtin)', ] ); $setup->endSetup(); } }步骤#3。 添加逻辑以使用后端
使用pool-modifier机制向 Magento 添加字段到自定义选项。
让我们创建以下文件:
`app/code/VendorName/OptionValueGtin/etc/adminhtml/di.xml`
<?xml version="1.0"?> <config xmlns:xsi="http://www.w3.org/2001/XMLSchema-instance" xsi:noNamespaceSchemaLocation="urn:magento:framework:ObjectManager/etc/config.xsd"> <virtualType name="MageWorx\OptionBase\Ui\DataProvider\Product\Form\Modifier\Pool"> <arguments> <argument name="modifiers" xsi:type="array"> <item name="mageworx-option-value-gtin" xsi:type="array"> <item name="class" xsi:type="string">MageWorx\OptionValueGtin\Ui\DataProvider\Product\Form\Modifier\OptionValueGtin</item> <item name="sortOrder" xsi:type="number">72</item> </item> </argument> </arguments> </virtualType> </config>这里:
我们将修改器添加到 Magento 2 的高级产品选项扩展的通用池中——
`MageWorx\OptionBase\Ui\DataProvider\Product\Form\Modifier\Pool`。
`VendorName\OptionValueGtin\Ui\DataProvider\Product\Form\Modifier\OptionValueGtin` 是修饰符类。
以下:
查看允许将我们的字段添加到 `app/code/VendorName/OptionValueGtin/Ui/DataProvider/Product/Form/Modifier/OptionValueGtin.php` 表单的代码:
<?php namespace VendorName\OptionValueGtin\Ui\DataProvider\Product\Form\Modifier; use Magento\Catalog\Ui\DataProvider\Product\Form\Modifier\AbstractModifier; use Magento\Catalog\Ui\DataProvider\Product\Form\Modifier\CustomOptions; use Magento\Ui\Component\Form\Element\Input; use Magento\Ui\Component\Form\Element\DataType\Number; use Magento\Ui\Component\Form\Field; use MageWorx\OptionBase\Ui\DataProvider\Product\Form\Modifier\ModifierInterface; class OptionValueGtin extends AbstractModifier implements ModifierInterface { /** * @var array */ protected $meta = []; /** * {@inheritdoc} */ public function modifyData(array $data) { return $data; } /** * {@inheritdoc} */ public function modifyMeta(array $meta) { $this->meta = $meta; $this->addFields(); return $this->meta; } /** * Adds fields to the meta-data */ protected function addFields() { $groupCustomOptionsName = CustomOptions::GROUP_CUSTOM_OPTIONS_NAME; $optionContainerName = CustomOptions::CONTAINER_OPTION; // Add fields to the values $valueFeaturesFields = $this->getValueFieldsConfig(); $this->meta[$groupCustomOptionsName]['children']['options']['children']['record']['children'] [$optionContainerName]['children']['values']['children']['record']['children'] = array_replace_recursive( $this->meta[$groupCustomOptionsName]['children']['options']['children']['record']['children'] [$optionContainerName]['children']['values']['children']['record']['children'], $valueFeaturesFields ); } /** * The custom option fields config * * @return array */ protected function getValueFieldsConfig() { $fields['gtin'] = $this->getGtinFieldConfig(); return $fields; } /** * Get gtin field config * * @return array */ protected function getGtinFieldConfig() { return [ 'arguments' => [ 'data' => [ 'config' => [ 'label' => __('GTIN'), 'componentType' => Field::NAME, 'formElement' => Input::NAME, 'dataType' => Number::NAME, 'dataScope' => 'gtin', 'sortOrder' => 92 ], ], ], ]; } /** * Check is current modifier for the product only * * @return bool */ public function isProductScopeOnly() { return false; } /** * Get sort order of modifier to load modifiers in the right order * * @return int */ public function getSortOrder() { return 32; } }现在,安装扩展并检查一切是否正确,即
- php bin/magento 模块:启用 VendorName_OptionValueGtin
- php bin/magento 设置:升级
- php bin/magento 缓存:刷新
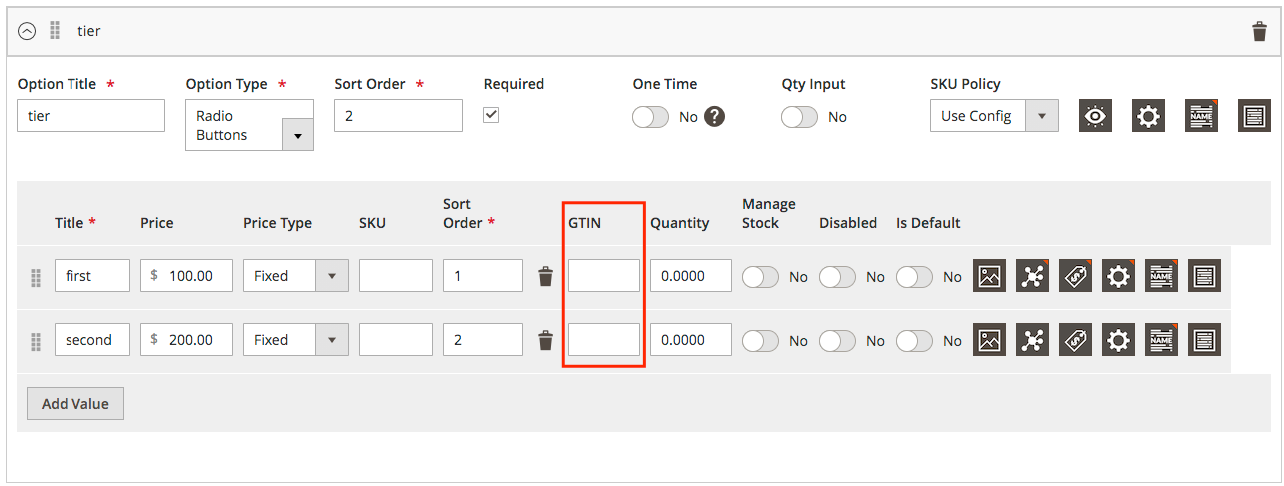
如您所见,新添加的字段现在显示:
第4步。 添加设置以禁用高级产品选项配置的 GTIN 字段显示
把我们的文章混在一起怎么样?
我提议添加一些新功能——在产品页面前端启用/禁用GTIN字段显示以显示选项值的能力。
您将需要创建文件:
`app/code/VendorName/OptionValueGtin/etc/adminhtml/system.xml`
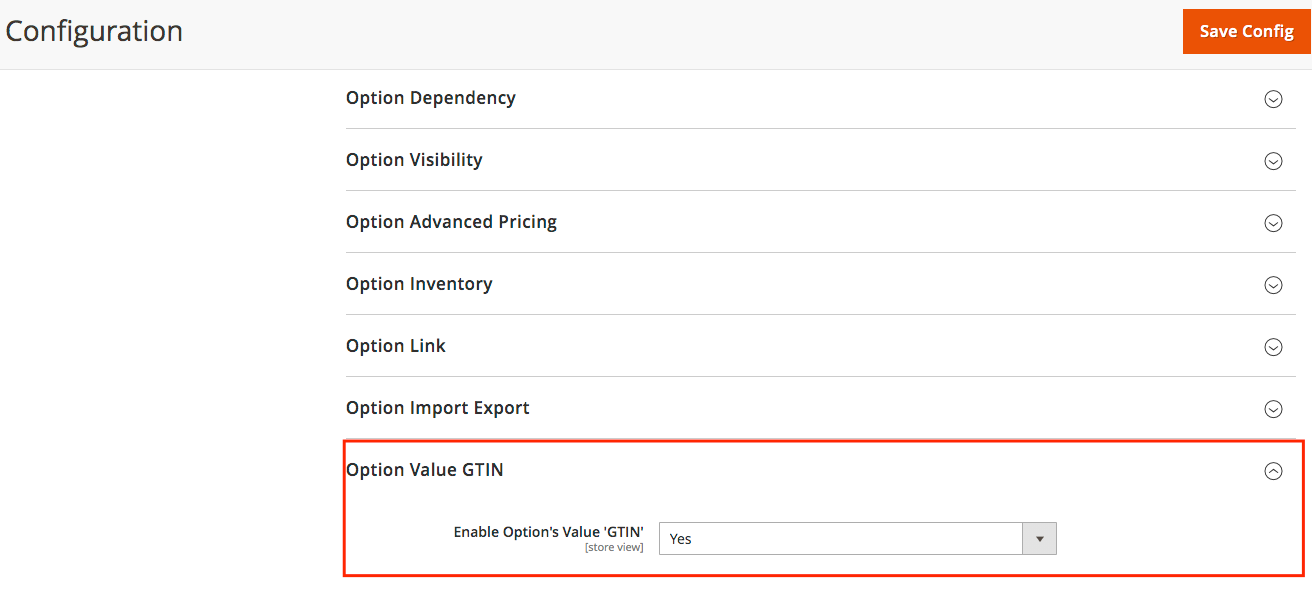
<?xml version="1.0"?> <config xmlns:xsi="http://www.w3.org/2001/XMLSchema-instance" xsi:noNamespaceSchemaLocation="urn:magento:module:Magento_Config:etc/system_file.xsd"> <system> <tab sortOrder="2001"> <label>MageWorx</label> </tab> <section translate="label" type="text" sortOrder="10" showInDefault="1" showInWebsite="1" showInStore="1"> <label><![CDATA[Advanced Product Options]]></label> <tab>mageworx</tab> <resource>VendorName_OptionValueGtin::config_optionvaluegtin</resource> <group translate="label" type="text" sortOrder="100" showInDefault="1" showInWebsite="1" showInStore="1"> <label><![CDATA[Option Value GTIN]]></label> <field translate="label" type="select" sortOrder="80" showInDefault="1" showInWebsite="1" showInStore="1"> <label><![CDATA[Enable Option's Value 'GTIN']]></label> <source_model>Magento\Config\Model\Config\Source\Yesno</source_model> </field> </group> </section> </system> </config>为简单起见:
我们将在高级产品选项扩展的配置中添加新的选项值 GTIN选项卡。 您也应该能够在您的模块中创建一个选项卡。
应该创建新的Helper 类。 在那里,我们将获得有关设置的数据。
因此,让我们创建并填写以下类:
`app/code/VendorName/OptionValueGtin/Helper/Data.php`
<?php namespace VendorName\OptionValueGtin\Helper; use Magento\Framework\App\Helper\AbstractHelper; use Magento\Store\Model\ScopeInterface; use Magento\Framework\App\Helper\Context; class Data extends AbstractHelper { const XML_PATH_DEFAULT_OPTION_VALUE_GTIN = 'mageworx_apo/optionvaluegtin/use_optionvaluegtin'; /** * Additional product attributes for product_attributes table * * @var array */ protected $additionalProductAttributes; /** * @param Context $context */ public function __construct( Context $context ) { parent::__construct($context); } /** * Check if option value GTIN enabled * * @param int|null $storeId * @return string */ public function isOptionValueGtinEnabled($storeId = null) { return $this->scopeConfig->getValue( self::XML_PATH_DEFAULT_OPTION_VALUE_GTIN, ScopeInterface::SCOPE_STORE, $storeId ); } } 不要忘记保存更改并清除缓存。

该设置应显示在管理面板中。
步骤#5。 在产品页面前端显示新字段
还记得我们在上一篇文章中谈到的吗?
我们提到我们的 MageWorx_OptionBase 模块已经有 `getExtendedOptionsConfig()` 方法,该方法通过块在前端收集和显示我们所有的自定义属性。
要查看它是如何实现的,请打开以下类:
`app/code/MageWorx/OptionBase/Block/Product/View/Options.php`
现在:
使用我们的属性创建一个模型:
`app/code/VendorName/OptionValueGtin/Model/Attribute/OptionValue/Gtin.php`
<?php namespace VendorName\OptionValueGtin\Model\Attribute\OptionValue; use MageWorx\OptionBase\Model\Product\Option\AbstractAttribute; class Gtin extends AbstractAttribute { /** * @return string */ public function getName() { return 'gtin'; } }通过依赖注入,将属性添加到 Advanced Product Options 扩展的通用属性块并创建以下文件:
`app/code/VendorName/OptionValueGtin/etc/di.xml`
<?xml version="1.0"?> <config xmlns:xsi="http://www.w3.org/2001/XMLSchema-instance" xsi:noNamespaceSchemaLocation="urn:magento:framework:ObjectManager/etc/config.xsd"> <!-- Data --> <type name="MageWorx\OptionBase\Model\Product\Option\Value\Attributes"> <arguments> <argument name="data" xsi:type="array"> <item name="gtin" xsi:type="object">VendorName\OptionValueGtin\Model\Attribute\OptionValue\Gtin</item> </argument> </arguments> </type> </config> 现在:
创建我们的新块和它的模板:
`app/code/VendorName/OptionValueGtin/Block/ValueGtin.php`
<?php namespace MageWorx\OptionValueGtin\Block; use Magento\Framework\Json\EncoderInterface; use Magento\Framework\View\Element\Template; use Magento\Framework\View\Element\Template\Context; use MageWorx\OptionValueGtin\Helper\Data as Helper; class ValueGtin extends Template { /** * @var EncoderInterface */ protected $jsonEncoder; /** * @var Helper */ protected $helper; /** * @param Context $context * @param EncoderInterface $jsonEncoder * @param Helper $helper * @param array $data */ public function __construct( Context $context, EncoderInterface $jsonEncoder, Helper $helper, array $data = [] ) { parent::__construct( $context, $data ); $this->jsonEncoder = $jsonEncoder; $this->helper = $helper; } /** * @return string */ public function getJsonData() { $data = [ 'isOptionValueGtinEnabled' => $this->helper->isOptionValueGtinEnabled($this->_storeManager->getStore()) ]; return $this->jsonEncoder->encode($data); } } 在这里,我们从Helper Class 获得了有关设置的数据。
下一个:
使用 `getJsonData()` 方法,让我们使用我们即将创建的模板将数据渲染到前端:
`app/code/VendorName/OptionValueGtin/view/frontend/templates/config.phtml`
<?php /** @var \VendorName\OptionValueGtin\Block\ValueGtin $block */ ?> <script> require([ 'jquery', 'optionValueGtin', 'uiRegistry' ], function ($, optionValueGtin, registry) { var optionBase = registry.get('mageworxOptionBase'); if (optionBase) { optionBase.addUpdater(7, optionValueGtin(<?= /* @noEscape */ $block->getJsonData() ?>)); } else { var updaters = registry.get('mageworxOptionUpdaters'); if (!updaters) { updaters = {}; } updaters[7] = optionValueGtin(<?= /* @noEscape */ $block->getJsonData() ?>); registry.set('mageworxOptionUpdaters', updaters); } }); </script> 我们使用JavaScript mixins机制来显示GTIN字段的值。
下一步是什么?
让我们采用不同的方法,创建一个 js 小部件,用于在产品页面上显示新数据。
定义新的js:
`app/code/VendorName/OptionValueGtin/view/frontend/requirejs-config.js`
var config = { map: { '*': { optionValueGtin: 'VendorName_OptionValueGtin/js/option-value-gtin' } } }; 现在是创建小部件本身的时候了。 它将包含工作中的所有逻辑以及前端的新属性。
在示例文件中,让我们分别为选择选项以及单选和复选框选项实现GTIN的显示逻辑。
这些将是两种不同的逻辑,因为这些选项的工作逻辑和标记彼此不同:
`app/code/VendorName/OptionValueGtin/view/frontend/web/js/option-value-gtin.js`
define([ 'jquery', 'Magento_Catalog/js/price-utils', 'underscore', 'jquery/ui' ], function ($, utils, _) { 'use strict'; $.widget('mageworx.optionValueGtin', { options: { optionConfig: {} }, /** * * @param optionConfig * @param productConfig * @param base * @param self */ firstRun: function firstRun(optionConfig, productConfig, base, self) { if (parseFloat(this.options.isOptionValueGtinEnabled)) { var extendedOptionsConfig = typeof base.options.extendedOptionsConfig != 'undefined' ? base.options.extendedOptionsConfig : {}; for (var option_id in optionConfig) { if (!optionConfig.hasOwnProperty(option_id)) { continue; } var $option = base.getOptionHtmlById(option_id); this._addValueGtin($option, optionConfig, extendedOptionsConfig); } } }, /** * Add description to the values * @param $option * @param optionConfig * @param extendedOptionsConfig * @private */ _addValueGtin: function _addValueGtin($option, optionConfig, extendedOptionsConfig) { var self = this, $options = $option.find('.product-custom-option'); //selectable options $options.filter('select').each(function (index, element) { var $element = $(element), optionId = utils.findOptionId($element), value = extendedOptionsConfig[optionId]['values']; if ($element.attr('multiple') && !$element.hasClass('mageworx-swatch')) { return; } if (typeof value == 'undefined' || _.isEmpty(value)) { return; } var gtinTitle = 'GTIN: '; var $gtin = $('<div class="option-value-gtin"></div>', { style: 'display: none' }); var $label = $option.find('.control'); $element.parent().prepend($gtin); $element.on('change', function (e) { var valueId = $element.val(); if (!_.isUndefined(value[valueId]) && !_.isEmpty(value[valueId]['gtin']) ) { if ($label.length > 0) { $label .first() .after($gtin.text(gtinTitle + value[valueId]['gtin'])); } $gtin.show(); } else { $gtin.hide(); } }); if ($element.val()) { $element.trigger('change'); } }); $options.filter('input[type="radio"], input[type="checkbox"]').each(function (index, element) { var $element = $(element), optionId = utils.findOptionId($element), value = extendedOptionsConfig[optionId]['values']; if ($element.attr('multiple') && !$element.hasClass('mageworx-swatch')) { return; } if (typeof value == 'undefined' || _.isEmpty(value)) { return; } var gtinTitle = 'GTIN: '; var $gtin = $('<div class="option-value-gtin-redio-check"></div>'); var $label = $option.find('.control'); $element.parent().append($gtin); var valueId = $element.val(); if (!_.isUndefined(value[valueId]) && !_.isEmpty(value[valueId]['gtin'])) { $gtin.text(gtinTitle + value[valueId]['gtin']); } if ($element.val()) { $element.trigger('change'); } }); }, }); return $.mageworx.optionValueGtin; });添加一些样式怎么样?
`app/code/VendorName/OptionValueGtin/view/frontend/web/css/valueGtin.css`
.option-value-gtin, .option-value-gtin-redio-check { color: #1da0e0; font-weight: 700; margin-top: 5px; } .option-value-gtin-redio-check { display: contents; }它只剩下连接我们的块和样式。
为此,创建以下文件:
`app/code/VendorName/OptionValueGtin/view/frontend/layout/catalog_product_view.xml`
<?xml version="1.0"?> <page layout="1column" xmlns:xsi="http://www.w3.org/2001/XMLSchema-instance" xsi:noNamespaceSchemaLocation="urn:magento:framework:View/Layout/etc/page_configuration.xsd"> <head> <css src="VendorName_OptionValueGtin::css/valueGtin.css"/> </head> <body> <referenceBlock name="product.info.options.wrapper"> <container name="vendorname.option.value.gtin.container" after="product.info.options"> <block class="VendorName\OptionValueGtin\Block\ValueGtin" name="vendorname.option.value.gtin" template="VendorName_OptionValueGtin::config.phtml"/> </container> </referenceBlock> </body> </page> 我们快完成了。
在我们运行最终检查之前,不要忘记清除缓存并再次部署静态内容:
- php bin/magento 缓存:刷新
- php bin/magento 静态内容:部署
最后:
登录到管理面板。
在 Magento 产品中创建具有自定义选项的产品。
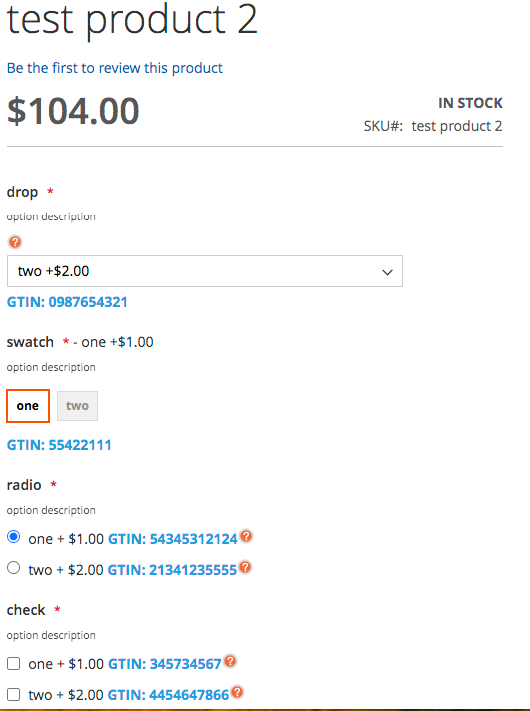
在我们的示例中,我添加了下拉列表、样本、单选和复选框。
不要忘记为相应的选项值填写我们的新GTIN字段。
保存产品。
是时候看看前端的样子了:
你觉得结果如何?
请在下面的评论字段中分享您对文章的反馈。 Magento 将字段添加到自定义选项有多容易?