
Magento 2 中创建模块的指南
已发表: 2015-11-20您是否正在寻找在 Magento 2 中创建模块的方法? 今天,我们将指导您如何在 Magento 2 中创建模块。希望您会喜欢它们并轻松使用它!
创建一个灵活的模块非常困难,但是我们有一个关于在 Magento 2 中创建一个简单模块的简单教程。希望本教程可以帮助您迈出第一步。 在创建模块之前,有必要了解两个 Magento 版本在目录结构上的差异。 在 Magento 2 目录结构中,代码池已从代码库文件结构中删除。 现在所有模块都按供应商分组。 因此,我们可以在 app/code 目录中创建模块。
最新更新:我们刚刚发布了 Claue Multipurpose Magento 2 主题的 2.0 版,其中包含一系列性能改进和独家功能。 立即查看此主题:Claue Magento Theme 2. 0

现场演示
Claue – Clean, Minimal Magento 2&1 Theme是现代和干净的电子商务商店的绝佳模板,具有 40 多种主页布局和大量商店、博客、投资组合、商店定位器布局和其他有用页面的选项。 Claue 版本 2. 0 带有一系列独家功能,包括:
- 基于 Luma 主题。
- 满足 Magento 主题的所有标准
- 显着的性能提升
- 与大多数第三方扩展兼容。
- 与 Magento 2.4.x 完全兼容
第二个高级版本与之前的版本完全不同。 因此,如果您使用的是 Claue 版本 1 并想更新到 Claue 版本 2,则只能重建新网站,而不是从旧版本更新。 现在,让我们回到主题。
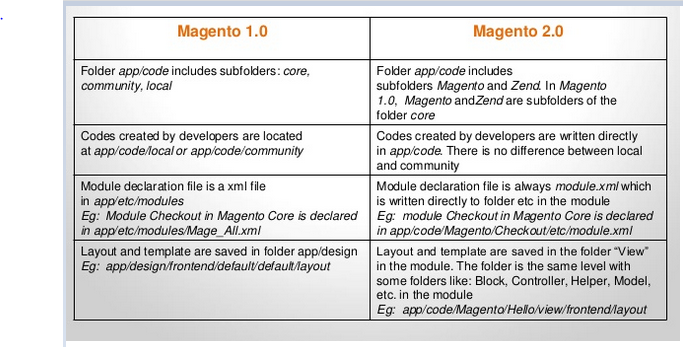
Magento1.0和Magento2.0的区别
Magento 1.0 和 Magento 2.0 之间存在一些基本区别,因此您可以轻松地可视化 Magento 2.0 中的文件夹结构。 因此,在 Magento 2.0 中制作一个简单的模块是轻而易举的事。
在 Magento2 中创建一个模块
第一步:创建配置文件。
– 创建文件: app/code/Tutorial/Example/etc/module.xml (目的:此文件将声明您的模块)并将以下代码插入其中:
- <? xml 版本= “1.0” ?>
- <config xmlns:xsi = “http://www.w3.org/2001/XMLSchema-instance” xsi:noNamespaceSchemaLocation = “..
- /../../../../lib/internal/Magento/Framework/Module/etc/module.xsd” >
- <模块名称= “Tutorial_Example” setup_version = “1.0.0” >
- </模块>
- </配置>
– 创建文件: app/code/Tutorial/Example/etc/frontend/routes.xml (目的: 前端模块的路由器将在此处声明):
- <? xml 版本= “1.0” ?>
- <config xmlns:xsi = “http://www.w3.org/2001/XMLSchema-instance” xsi:noNamespaceSchemaLocation = “..
- /../../../../../lib/internal/Magento/Framework/App/etc/routes.xsd” >
- <路由器ID = “标准” >
- <route id = “example” frontName = “example” >
- <模块名称= “Tutorial_Example” />
- </路线>
- </路由器>
- </配置>
第 2 步:创建控制器、布局和模板文件。
创建配置文件后,我们将从控制器、布局和模板文件开始。
– 创建控制器文件: app/code/Tutorial/Example/Controller/Index/Index.php 并输入以下代码:
- <? php
- 命名空间教程\Example\Controller\Index ;
- 使用Magento \Framework\App\Action\Context ;
- 使用Magento \Framework\View\Result\PageFactory ;
- 类索引扩展\Magento\Framework\App\Action\Action
- {
- /**
- * @param 上下文 $context
- * @param PageFactory $resultPageFactory
- */
- 公共函数__construct (
- 上下文$context ,
- 页面工厂$resultPageFactory
- )
- {
- 父:: __construct ( $context );
- $this -> resultPageFactory = $resultPageFactory ;
- }
- 公共函数执行()
- {
- $resultPageFactory = $this -> resultPageFactory -> create ();
- // 添加页面标题
- $resultPageFactory -> getConfig ()-> getTitle ()-> set ( __ ( 'Example module' ));
- // 添加面包屑
- /** @var \Magento\Theme\Block\Html\Breadcrumbs */
- $breadcrumbs = $resultPageFactory -> getLayout ()-> getBlock ( 'breadcrumbs' );
- $breadcrumbs -> addCrumb ( 'home' ,
- [
- '标签' => __ ( '家' ),
- 'title' => __ ( '家' ),
- '链接' => $this -> _url -> getUrl ( ” )
- ]
- );
- $breadcrumbs -> addCrumb ( 'tutorial_example' ,
- [
- '标签' => __ ( '例子' ),
- '标题' => __ ( '例子' )
- ]
- );
- 返回$resultPageFactory ;
- }
- }
– 创建布局文件: 应用程序/代码/教程/示例/视图/前端/布局/example_index_index.xml

- <? xml 版本= “1.0”编码= “UTF-8” ?>
- <页面xmlns:xsi = “http://www.w3.org/2001/XMLSchema-instance”布局= “3columns”
- xsi:noNamespaceSchemaLocation = “../../../../../../../lib/internal/Magento/Framework/View/Layout/
- etc/page_configuration.xsd” >
- <正文>
- <referenceContainer名称= “内容” >
- <block class = “Magento\Framework\View\Element\Template” name = “tutorial_example_block”
- 模板= “Tutorial_Example::index.phtml” />
- </referenceContainer>
- </正文>
- </页面>
– 创建模板文件: app/code/Tutorial/Example/view/frontend/templates/index.phtml
<h1> <? php echo __ ( '这是一个示例模块!' ) ?> </h1>
第三步:在 Magento 2 的配置文件中激活模块
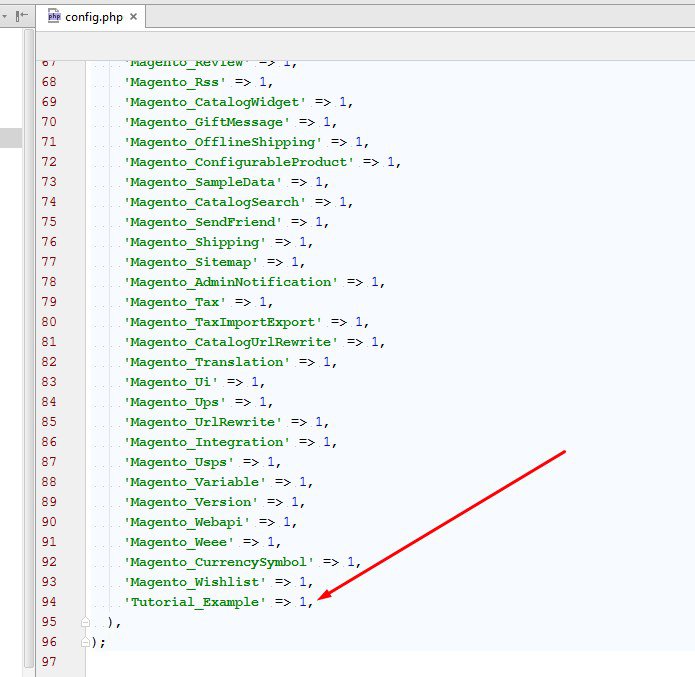
我们将通过打开来激活此模块 应用程序/etc/config.php 文件,然后将这一行添加到其中:
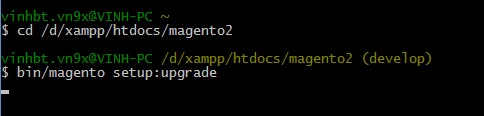
然后在 Windows 中打开命令(或在 Linux 和 MAC OS 中打开终端)。 转到您的 Magento 根文件夹并运行此命令行来安装您的模块:
bin\magento 设置:升级
最后,清除 Magento 缓存,然后使用 url 访问 http://localhost/magento2/example/index/index/
访问 Magesolution 博客,不错过任何有关 Magento 2.0 的更新或教程